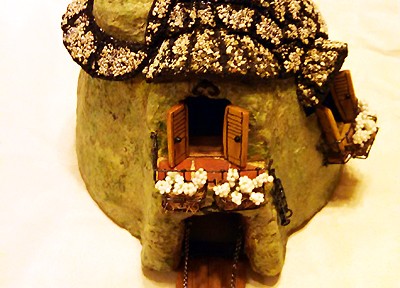
Fairy Castle Cottage sporting her new shingled roof.
Recycling leftover asphalt roof shingles has been an interesting experience for me. I had a small stack of repair shingles stashed away that were no longer needed and I wondered if could I use them for roofing the Fairy’s Castle Cottage. They worked out pretty well and I believe I’ve found another material to craft with!
Asphalt roofing shingles are fairly easy to cut and bent into shape, the tiny gravels can be etched off to create designs, and the shingles can be glued to other materials. The down side is that they are a bit messy, smelly, and rough to work with, but so are many of my favorite materials.
WARNING: There are health concerns with handling and inhaling fumes from asphalt shingles for an extended period like those working in roofing business! If you are ill or pregnant, you probably shouldn’t be playing around with any kind of petroleum-based materials in the first place. I work in a well ventilated area because of glue and paint fumes (plus it’s hot in here without a fan), and sometimes I actually wear gloves (the gritty shingle gravel bits are scratchy), so my shingle play day was no different from any other project day.
Cutting Loose

Drawing the design on the shingle with a permanent marker.

Cutting asphalt shingles with a zip knife.
I tried several different tools before settling on a permanent marker to draw guidelines, scissors for the straight cuts, and a zip knife (X-acto or box cutter will do just as well) for the cutting curves. I had to constantly wipe the residue from the blades, which may not be entirely necessary, but I’m distracted by such things.
The scissor blades can be cleaned with various horrible smelling dangerous chemicals, but I was in a hurry so used a scrubby, concentrated dish soap, hot water, and elbow grease.
Shape-Shifting Shingles

A well ventilated area and heavy gloves are definitely needed with heating shingles! Everything gets quite smelly and very warm to the touch. I used a heat gun on the lowest setting and a heat tolerant measuring cup to try forming the shingles over curved shapes.
Hot Conclusions:
- The heated shingles bend well for a large radius, but need to be held into place until cooled to keep the shape.
- Too small of a bend radius will cause the asphalt to crack and possibly break.
- Too much heat may cause the shingles to become brittle, and possibly catch fire.
- Cutting, or removing sections of the shingle material will help it conform to the shape much better (refer to photo above).
- Scoring, carving, or etching, a line by removing the gravels serve as control joints or guides that allow the pieces to bend into a smaller radius without cracking. However, the pieces will bend along an etched line without the heat! Heating is unnecessary unless a permanent form is desired (refer to photo below)!

Bending on an etched line of the shingle.
Gravel Etching, Oh My

Etching or carving asphalt shingles with a dental pick.
I really enjoyed etching the shingles. I used a black permanent marker to create a design, and then used a dental pick to scrap or dig the tiny gravels away to expose the black asphalt material. The gravels don’t always follow the design lines so a wider line may develop. You may want to wear eye protection since the gravels tend to fly out in all directions.
The etched lines can be used purely as a design element or as a bending line as mentioned. I used both properties to my advantage on the Fairy’s Castle Cottage. I etched strips of individual mini “shingles”, which also allowed me to easily bend the strips around the curved surface of the miniature house. I had to cut a few custom miniature shingles to fit the center top of the fairy house roof, like a mosaic or jigsaw puzzle, because the area was so tiny.
Gluing Up on the Roof

Gluing shingles onto the house top.
- Hot glue seemed to work at first, but it took very little force to remove the shingles after a day or two. Also, the glue easily pulled away from the asphalt shingle backing so I could reuse the pieces I removed. Hot glue is not the answer for permanent attachment, although, it might be a good choice for temporary placement.
- I had great success using E6000 glue (it comes in little squeeze tubes now)! It quickly took hold with lightly applied pressure and the pieces stayed in place only after a minute or two.
- I’m sure any clear Silicone adhesive would do the job well, too.
- Pre-bending the etched strips of shingle before the glue was applied helped them fit the contours of the house and stay in place very well.
It Be Done

Front view of house roof.
There are a few things I wish I’d done differently, but overall, I’m pleased with the finished Fairy’s Castle Cottage roof. I learned a lot and had fun doing it.

A view of the roof top from the rear.
Pondering the Potential . . .
Now that I have a little experience, I’ll be using the asphalt shingles for other projects that don’t include roofs! I’m thinking of carving designs into shingles and then mounting them on papercrete, wood, . . . Oh, I wonder if grout will stick to shingles?

Etching ancient rune characters on an asphalt shingle. I’m not sure what I’ll do with them yet. I just think they’re neat looking!
.:*~*:._.:*~*:..:*~*:._.:*~*:..:*~*:._.:*~*:.


